check engine Ram 1500 2013 Get to Know Guide
[x] Cancel search | Manufacturer: RAM, Model Year: 2013, Model line: 1500, Model: Ram 1500 2013Pages: 196, PDF Size: 9.66 MB
Page 49 of 196
NOTE:
For security reasons, this link is valid for 24 hours from the time you submit your mail
address into the radio touch screen. If the link has expired, simply re-enter your mail
address into the Uconnect
®Registration App on the radio touch screen to receive
another link.
7. Check for an email from Uconnect
®Access that contains your personalized
registration link. IF you don't see it, check your spam or junk mail folder. Open the
email and click on the link to continue registering.
• The secured registration link will take you through the Uconnect
®Access
registration process step by step.
• To unlock the full potential of Uconnect
®Access in your vehicle, you will need to
create or validate an existing Mopar Owner Connect account (previously Owner
Center). Uconnect
®along with Mopar Owner Connect have joined forces to create
one destination to manage all of your vehicle needs - from managing your
Uconnect
®Access account to tracking service history and finding recommended
accessories for your vehicle. If you already have a Mopar Owner Connect account,
log in to the website with your existing user name and password. For assistance
with this web based registration process, U.S. residents can call Uconnect
®Care
at 855-792-4241.
• At this point your vehicle is registered with Uconnect
®Access. Apps will be
downloaded the next time you start your vehicle. It may take over 30 minutes for
all of the apps to install. If the apps have not appeared after 24 hours, please
contact Uconnect
®Care. The recommended next steps are to:
• Set up your Payment Account. (Provides the option to purchase packages and apps, such as WiFi Hotspot)
• Download the Uconnect
®Access App. (Allows you to utilize the Remote Services
such as Remote Door Unlock)
Download the Uconnect® Access App
• If you own a compatible iOS or Android
®powered device, the Uconnect Access
App allows you to remotely lock or unlock your doors, start your engine or activate
your horn and lights from virtually anywhere (Vehicle must be within the United
States and have network coverage). You can download the App from Mopar Owner
Connect or from the Apple App or Google Play store. For Uconnect
®Phone
customer support and to determine if your device is compatible:
• U.S. residents - visit www.UconnectPhone.com or call 1–877–855–8400
• Canadian residents - call 1–800–465–2001 (English) or 1–800–387–9983 (French)
ELECTRONICS
47
Page 101 of 196
Uconnect® Access Customer Programmable Features
• The Uconnect
®Access system allows you to access Customer Programmable
feature settings such as Display, Clock, Safety/Assistance, Lights, Doors & Locks,
Heated Seats, Engine Off Operation, Compass Settings, Audio, Phone/ Bluetooth
and SiriusXM Setup through soft-keys.
• Touch the More soft-key to on the bottom of the screen, then touch the Settings soft-key to access the Settings screen. When making a selection, scroll up or down
until the preferred setting is highlighted, then press and release the preferred
setting until a check-mark appears next to the setting, showing that setting has
been selected. The following feature settings are available:
• Display • Clock
• Safety / Assistance • Doors & Locks
• Auto-On Comfort & Remote Start • Engine Off Options
• Compass • Audio
• Phone / Bluetooth • SiriusXM Setup
• Lights
EVIC Reconfigurable Screen Setup
• The following settings allow you to change what information is displayed in the instrument cluster as well as the location that information is displayed.
Digital Speedometer
• Press and release the UP or DOWN arrow button until the Digital display icon ishighlighted in the EVIC. Press and release the RIGHT arrow button to change the
display between km/h and mph.
Vehicle Info (Customer Information Features)
• Press and release the UP or DOWN button until the Vehicle Info icon is highlightedin the EVIC. Press and release the RIGHT button and Coolant Temp will be
displayed. Press the UP or DOWN arrow button to scroll through the following
information sub-menus:• Tire Pressure
• Coolant Temperature
Trip A
• Press and release the UP or DOWN arrow button until the Trip A icon is highlighted in the EVIC. Press and release the RIGHT arrow button to display the Trip A
information.
Trip B
• Press and release the UP or DOWN arrow button until the Trip B icon is highlightedin the EVIC. Press and release the RIGHT arrow button to display the Trip B
information.
ELECTRONICS
99
Page 122 of 196
DIESEL ENGINE BREAK-IN RECOMMENDATIONS
• The Cummins®turbocharged diesel engine does not require a break-in period due
to its construction. Normal operation is allowed, providing the following recom-
mendations are followed: • Warm up the engine before placing it under load.
• Do not operate the engine at idle for prolonged periods.
• Use the appropriate transmission gear to prevent engine lugging.
• Observe vehicle oil pressure and temperature indicators.
• Check the coolant and oil levels frequently.
•
Vary throttle position at highway speeds when carrying or towing significant weight.
NOTE:
Light duty operation such as light trailer towing or no load operation will extend the
time before the engine is at full efficiency. Reduced fuel economy and power may be
seen at this time.
• Because of the construction of the Cummins
®turbocharged diesel engine, engine
run-in is enhanced by loaded operating conditions which allow the engine parts to
achieve final finish and fit during the first 6,000 miles (10 000 km).
DIESEL ENGINE STARTING PROCEDURES
Engine Block Heater
• For ambient temperatures below 0°F (-18°C), engine block heater usage is recommended.
• For ambient temperatures below –20°F (-29°C), engine block heater usage is required.
• The engine block heater cord is routed under the hood to the right side and can be located just behind the grille near the headlamp.
• Connect the heater cord to a ground-fault interrupter protected 110–115 volt AC electrical outlet with a grounded, three-wire extension cord.
NOTE:
The block heater will require 110 volts AC and 6.5 amps to activate the heater element.
•The block heater must be plugged in at least one hour to have an adequate warming
effect on the coolant.
Water In Fuel Message
•
If a Water In Fuel message orindicator appears in the cluster and a chime
sounds five times, the fuel/water separator will need to be drained immediately to
prevent engine damage.
• Refer to “Draining Fuel Water Separator” in this guide for draining instructions or see your dealer.
DIESEL
120
Page 133 of 196
•Your vehicle has also been equipped with a TPMS malfunction indicator to indicate
when the system is not operating properly. The TPMS malfunction indicator is
combined with the low tire pressure telltale. When the system detects a malfunction,
the telltale will flash for approximately one minute and then remain continuously
illuminated. This sequence will continue each time the vehicle is restarted as long as
the malfunction exists.
• When the malfunction indicator is illuminated, the system may not be able to detect or signal low tire pressure as intended. TPMS malfunctions may occur for a
variety of reasons, including the installation of replacement or alternate tires or
wheels on the vehicle that prevent the TPMS from functioning properly. Always
check the TPMS malfunction telltale after replacing one or more tires or wheels on
your vehicle, to ensure that the replacement or alternate tires and wheels allow the
TPMS to continue to function properly.
NOTE:
Tire pressures change by approximately 1 psi (7 kPa) per 12° F (7° C) of air temperature
change. Keep this in mind when checking tire pressure inside a garage, especially in the
Winter. Example: If garage temperature is 68°F (20°C) and the outside temperature is
32°F (0°C), then the cold tire inflation pressure should be increased by 3 psi (21 kPa),
which equals 1 psi (7 kPa) for every 12°F (7°C) for this outside temperature condition.
CAUTION!
The TPMS has been optimized for the original equipment tires and wheels. TPMS
pressures and warning have been established for the tire size equipped on your
vehicle. Undesirable system operation or sensor damage may result when using
replacement equipment that is not of the same size, type, and/or style. Aftermarket
wheels can cause sensor damage. Do not use tire sealant from a can, or balance
beads if your vehicle is equipped with a TPMS, as damage to the sensors may result.
- Engine Temperature Warning Light
• This light warns of an overheated engine condition.
• If the light turns on and a warning chime sounds while driving, safely pull over and stop the vehicle. If the A/C system is on, turn it off. Also, shift the transmission into
NEUTRAL and idle the vehicle. If the temperature reading does not return to
normal, turn the engine off immediately.
• We recommend that you do not operate the vehicle or engine damage will occur. Have the vehicle serviced immediately.
WARNING!
A hot engine cooling system is dangerous. You or others could be badly burned by
steam or boiling coolant. You may want to call an authorized dealer for service if
your vehicle overheats.
WHAT TO DO IN EMERGENCIES
131
Page 134 of 196
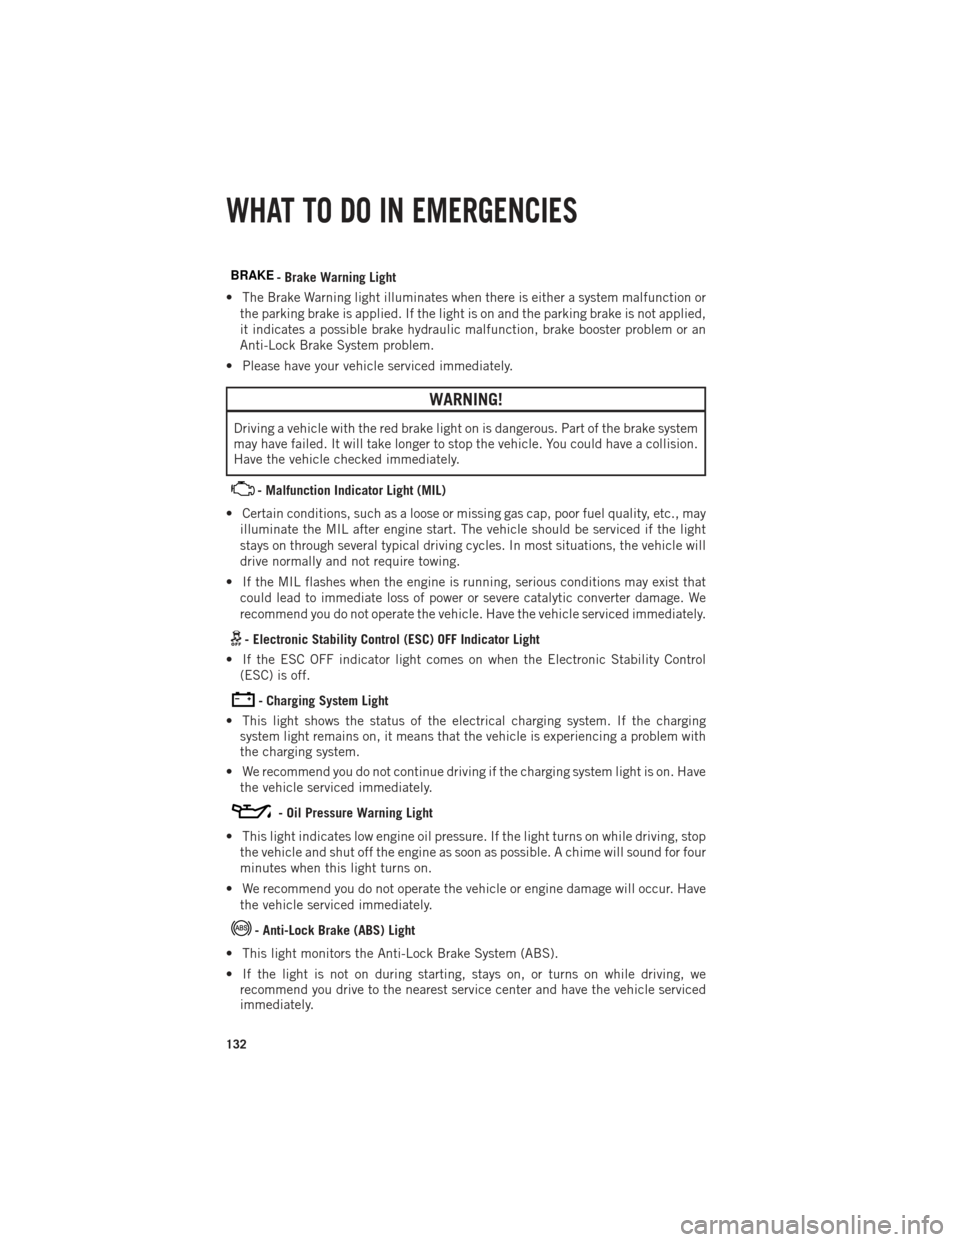
BRAKE- Brake Warning Light
• The Brake Warning light illuminates when there is either a system malfunction or the parking brake is applied. If the light is on and the parking brake is not applied,
it indicates a possible brake hydraulic malfunction, brake booster problem or an
Anti-Lock Brake System problem.
• Please have your vehicle serviced immediately.
WARNING!
Driving a vehicle with the red brake light on is dangerous. Part of the brake system
may have failed. It will take longer to stop the vehicle. You could have a collision.
Have the vehicle checked immediately.
- Malfunction Indicator Light (MIL)
• Certain conditions, such as a loose or missing gas cap, poor fuel quality, etc., may illuminate the MIL after engine start. The vehicle should be serviced if the light
stays on through several typical driving cycles. In most situations, the vehicle will
drive normally and not require towing.
• If the MIL flashes when the engine is running, serious conditions may exist that could lead to immediate loss of power or severe catalytic converter damage. We
recommend you do not operate the vehicle. Have the vehicle serviced immediately.
- Electronic Stability Control (ESC) OFF Indicator Light
• If the ESC OFF indicator light comes on when the Electronic Stability Control (ESC) is off.
- Charging System Light
• This light shows the status of the electrical charging system. If the charging system light remains on, it means that the vehicle is experiencing a problem with
the charging system.
• We recommend you do not continue driving if the charging system light is on. Have the vehicle serviced immediately.
- Oil Pressure Warning Light
• This light indicates low engine oil pressure. If the light turns on while driving, stop the vehicle and shut off the engine as soon as possible. A chime will sound for four
minutes when this light turns on.
• We recommend you do not operate the vehicle or engine damage will occur. Have the vehicle serviced immediately.
- Anti-Lock Brake (ABS) Light
• This light monitors the Anti-Lock Brake System (ABS).
• If the light is not on during starting, stays on, or turns on while driving, we recommend you drive to the nearest service center and have the vehicle serviced
immediately.
WHAT TO DO IN EMERGENCIES
132
Page 170 of 196
MAINTENANCE SCHEDULE – GASOLINE ENGINE
Your vehicle is equipped with an automatic oil change indicator system. The oil change
indicator system will remind you that it is time to take your vehicle in for scheduled
maintenance.
Based on engine operation conditions, the oil change indicator message will
illuminate. This means that service is required for your vehicle. Operating conditions
such as frequent short-trips, trailer tow, extremely hot or cold ambient temperatures,
and E85 fuel usage will influence when the “Oil Change Required” message is
displayed. Severe Operating Conditions can cause the change oil message to
illuminate as early as 3,500 miles (5,600 km) since last reset. Have your vehicle
serviced as soon as possible, within the next 500 miles (805 km).
Your authorized dealer will reset the oil change indicator message after completing
the scheduled oil change. If a scheduled oil change is performed by someone other
than your authorized dealer, the message can be reset by referring to the steps
described under “Electronic Vehicle Information Center (EVIC)/Oil Change Re-
quired” in “Understanding Your Instrument Panel” for further information.
NOTE:
Under no circumstances should oil change intervals exceed 10,000 miles (16,000 km)
or twelve months, whichever comes first.
Once A Month Or Before A Long Trip:
• Check engine oil level
• Check windshield washer fluid level
• Check the tire inflation pressures and look for unusual wear or damage
• Check the fluid levels of the coolant reservoir, brake master cylinder, powersteering (2500/3500 Models Only) and automatic transmission (six-speed only) as
needed
• Check function of all interior and exterior lights
MAINTAINING YOUR VEHICLE
168
Page 172 of 196
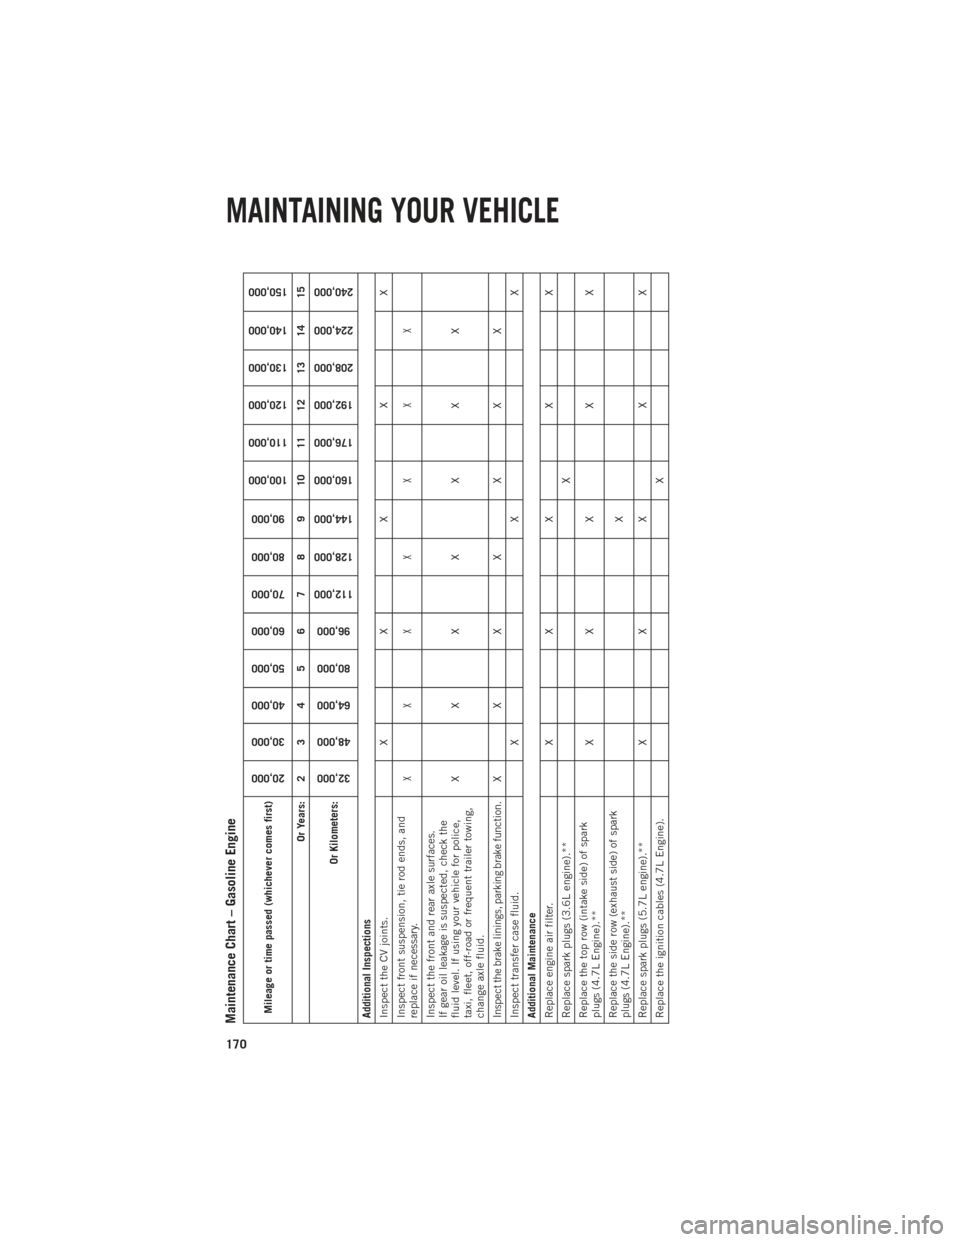
Maintenance Chart – Gasoline EngineMileage or time passed (whichever comes first)
20,000
30,000
40,000
50,000
60,000
70,000
80,000
90,000
100,000
110,000
120,000
130,000
140,000
150,000
Or Years: 2 3 4 5 6 7 8 9 10 11 12 13 14 15
Or Kilometers:
32,000
48,000
64,000
80,000
96,000
112,000
128,000
144,000
160,000
176,000
192,000
208,000
224,000
240,000
Additional Inspections
Inspect the CV joints. X X X X X
Inspect front suspension, tie rod ends, and
replace if necessary.
XX X X X X X
Inspect the front and rear axle surfaces.
If gear oil leakage is suspected, check the
fluid level. If using your vehicle for police,
taxi, fleet, off-road or frequent trailer towing,
change axle fluid. XX X X X X XInspect the brake linings, parking brake function.
XX X X X X X
Inspect transfer case fluid. X X X
Additional Maintenance
Replace engine air filter. X X X X X
Replace spark plugs (3.6L engine).** X
Replace the top row (intake side) of spark
plugs (4.7L Engine).** XX X X X
Replace the side row (exhaust side) of spark
plugs (4.7L Engine).** X
Replace spark plugs (5.7L engine).** X X X X X
Replace the ignition cables (4.7L Engine). X
MAINTAINING YOUR VEHICLE
170
Page 175 of 196
MAINTENANCE SCHEDULE – DIESEL ENGINE
CAUTION!
Failure to perform the required maintenance items may result in damage to the
vehicle.
At Each Stop For Fuel
• Check the engine oil level at least 30 minutes after a fully warmed engine is shut off. Checking the oil level while the vehicle is on level ground will improve the
accuracy of the oil level reading. Add oil only when the level is at or below the ADD
or MIN mark.
Once A Month
• Inspect the batteries, and clean and tighten the terminals as required.
• Check the fluid levels of the coolant reservoir, brake master cylinder, and automatic transmission (if equipped), and add as needed.
At Each Oil Change
• Change the engine oil filter.
• Inspect the exhaust system.
• Check the coolant level, hoses, and clamps.
• Lubricate outer tie rod ends.
Inspection and service should also be performed anytime a malfunction is observed
or suspected. Retain all receipts.
Oil Change Indicator System
Your vehicle is equipped with an engine oil change indicator system. This system will
alert you when it is time to change your engine oil by displaying the words “Oil
Change Due” on your Electronic Vehicle Information Center (EVIC). The oil change
reminder will remind the owner to change the engine oil every 15,000 miles or 500
hours, whichever comes first, except for the Chassis Cab models that are using B20
biodiesel, which are 12,500 miles or 400 hours, whichever comes first. Failure to
change the engine oil per the maintenance schedule can result in internal engine
damage.
MAINTAINING YOUR VEHICLE
173
Page 177 of 196
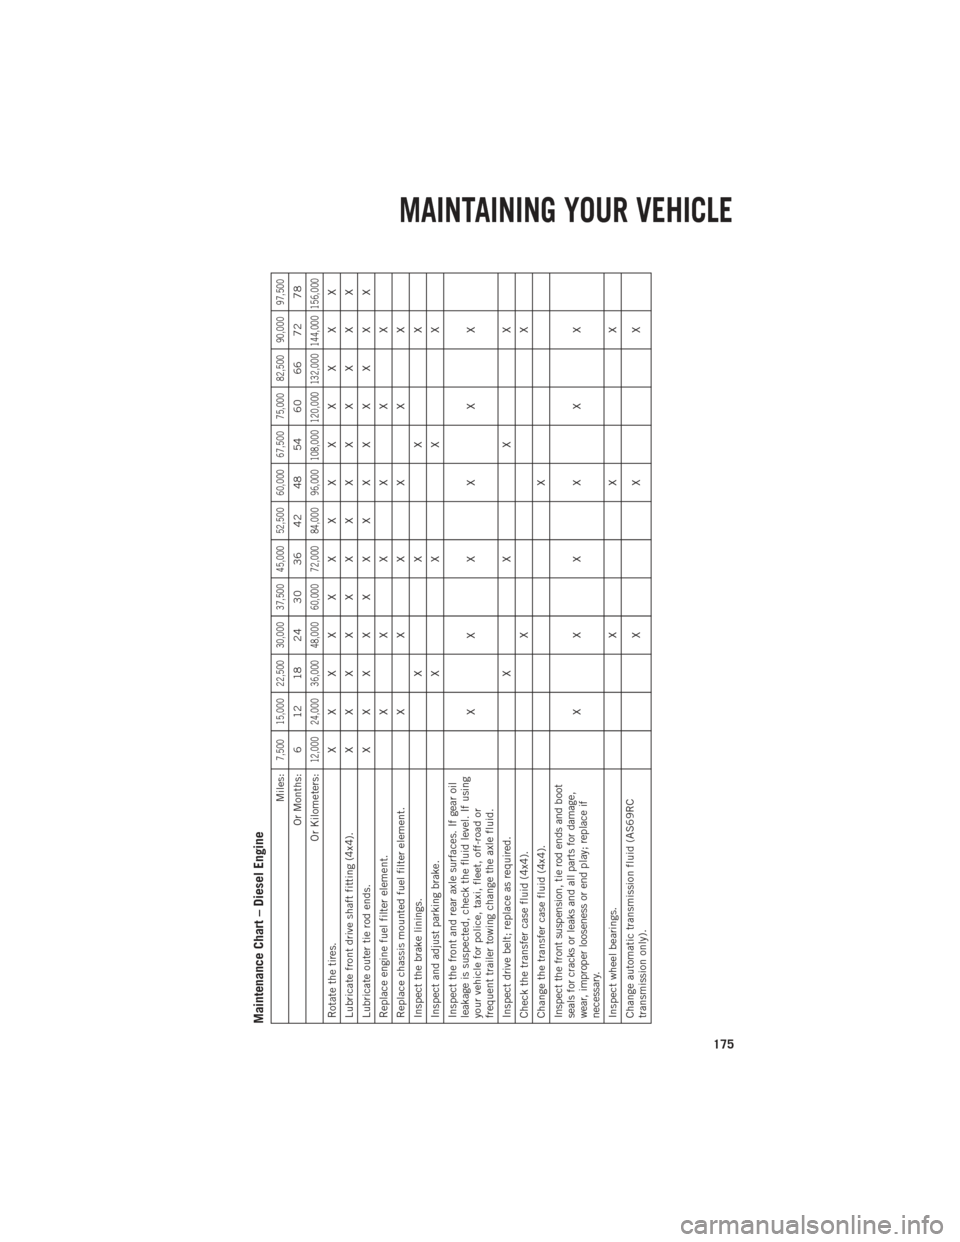
Maintenance Chart – Diesel Engine
Miles:
7,500 15,000 22,500 30,000 37,500 45,000 52,500 60,000 67,500 75,000 82,500 90,000 97,500
Or Months: 6 12 18 24 30 36 42 48 54 60 66 72 78
Or Kilometers:
12,000 24,000 36,000 48,000 60,000 72,000 84,000 96,000 108,000 120,000 132,000 144,000 156,000
Rotate the tires. X XXXXXXXXXXXX
Lubricate front drive shaft fitting (4x4). X XXXXXXXXXXXX
Lubricate outer tie rod ends. X XXXXXXXXXXXX
Replace engine fuel filter element. XXXXXX
Replace chassis mounted fuel filter element. XXXXXX
Inspect the brake linings. XXXX
Inspect and adjust parking brake. XXXX
Inspect the front and rear axle surfaces. If gear oil
leakage is suspected, check the fluid level. If using
your vehicle for police, taxi, fleet, off-road or
frequent trailer towing change the axle fluid. XXXXXX
Inspect drive belt; replace as required. XXXX
Check the transfer case fluid (4x4). XX
Change the transfer case fluid (4x4). XInspect the front suspension, tie rod ends and boot
seals for cracks or leaks and all parts for damage,
wear, improper looseness or end play; replace if
necessary.
XXXXXX
Inspect wheel bearings. XXX
Change automatic transmission fluid (AS69RC
transmission only). XXX
MAINTAINING YOUR VEHICLE
175
Page 189 of 196
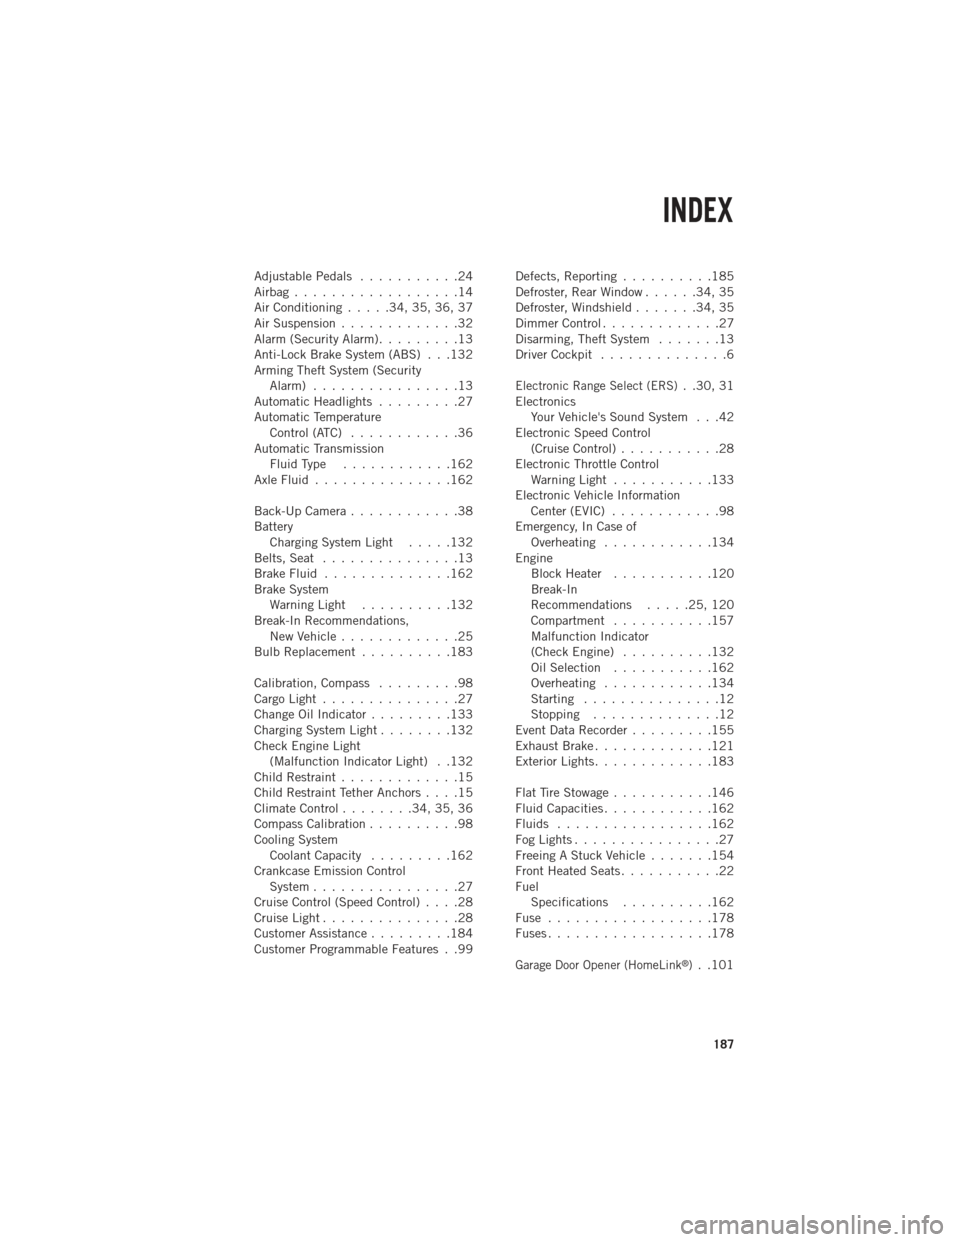
AdjustablePedals ...........24
Airbag..................14
Air Conditioning.....34,35,36,37
Air Suspension .............32
Alarm (Security Alarm) .........13
Anti-Lock Brake System (ABS) . . .132
Arming Theft System (Security Alarm) ................13
Automatic Headlights .........27
Automatic Temperature Control (ATC) ............36
Automatic Transmission FluidType ............162
AxleFluid...............162
Back-Up Camera ............38
Battery Charging System Light .....132
Belts, Seat ...............13
Brake Fluid ..............162
Brake System WarningLight ..........132
Break-In Recommendations, New Vehicle .............25
BulbReplacement ..........183
Calibration,Compass .........98
CargoLight...............27
ChangeOilIndicator.........133
Charging System Light ........132
Check Engine Light (Malfunction Indicator Light) . .132
Child Restraint .............15
Child Restraint Tether Anchors ....15
Climate Control ........34,35,36
Compass Calibration ..........98
Cooling System Coolant Capacity .........162
Crankcase Emission Control System ................27
Cruise Control (Speed Control) ....28
CruiseLight...............28
Customer Assistance .........184
Customer Programmable Features . .99 Defects, Reporting
..........185
Defroster, Rear Window ......34,35
Defroster, Windshield .......34,35
DimmerControl.............27
Disarming, Theft System .......13
Driver Cockpit ..............6
Electronic Range Select (ERS). .30, 31
Electronics Your Vehicle's Sound System . . .42
Electronic Speed Control (Cruise Control) ...........28
Electronic Throttle Control WarningLight ...........133
Electronic Vehicle Information Center (EVIC) ............98
Emergency, In Case of Overheating ............134
Engine BlockHeater ...........120
Break-In
Recommendations .....25,120
Compartment ...........157
Malfunction Indicator
(CheckEngine) ..........132
Oil Selection ...........162
Overheating ............134
Starting ...............12
Stopping ..............12
Event Data Recorder .........155
Exhaust Brake .............121
Exterior Lights .............183
FlatTireStowage...........146
Fluid Capacities ............162
Fluids .................162
FogLights................27
Freeing A Stuck Vehicle .......154
Front Heated Seats ...........22
Fuel Specifications ..........162
Fuse ..................178
Fuses..................178
Garage Door Opener (HomeLink®). .101
INDEX
187